
Blog
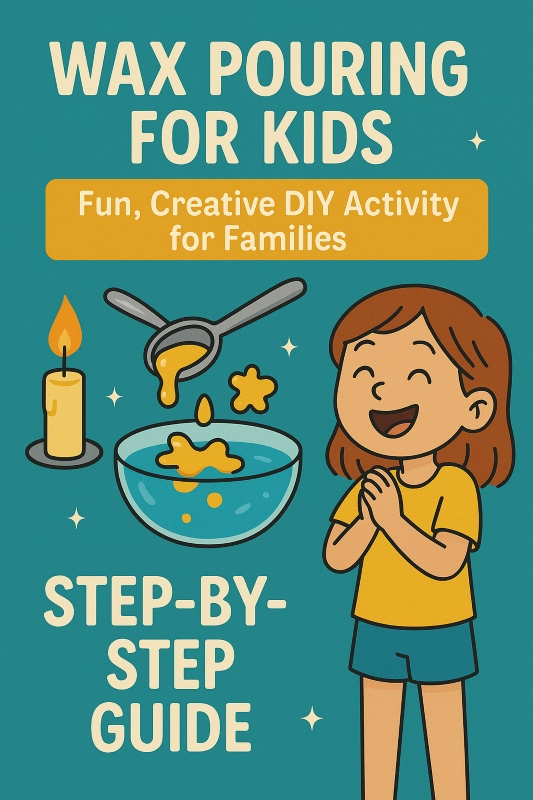
Wax pouring with children – magic from a tealight
Wax pouring is like kitchen magic — just without the wand, but with plenty of giggles, mess, and imagination. Whether it’s a rainy afternoon, a fun activity for a kids’ birthday party, or simply because it’s Tuesday — wax pouring is always a good idea. And the best part? You don’t need much more than some leftover candles, a spoon, and kids who love to be amazed.
Because what happens when liquid wax drips into cold water? Exactly: mini sculptures that look like tooth-gap dolphins, exploding popcorn balls, or Dad’s long-lost sock. And then the fun begins — interpreting them! What could it be? A lucky charm? A secret sign? Or just undeniable proof that kids are the world’s best storytellers?
➡️ Wax pouring is fun, boosts creativity, and brings the whole family together — without prep stress or fancy crafting supplies.
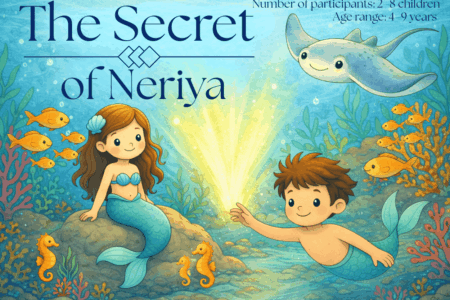
🎉 Ready for the Adventure?
Get the complete Magic scavenger hunt – printable, ready in minutes, no prep stress!
What Exactly Is Wax Pouring — and Why Do Kids Love It?
Last updated: April 2026 | Reading time: 10 min
This guide is based on real-world experience and has been reviewed for accuracy and age-appropriateness. Our goal is to help parents create memorable experiences for their children.
Wax pouring is incredibly simple: you melt wax (old candles or tealights work perfectly), pour it carefully into cold water — and watch the magic happen. Strange, funny, or surprisingly pretty shapes appear instantly, ready to be interpreted. Is it a dinosaur wearing a hat? A retired noodle? Or maybe a heart with wings?
Kids adore this mix of experimenting, surprises, and imagination. It sizzles a little, it bubbles for a moment — and suddenly a brand-new wax creature is born, waiting to be guessed and giggled about. And as a parent, you can either sit back and enjoy or join the fun (spoiler: adults see “a croissant on a world tour,” while kids usually see “a rocket with shark teeth” — obviously!).
✨ In short: wax pouring is a mini creativity workshop for the imagination — no Pinterest pressure, no craft-room chaos.
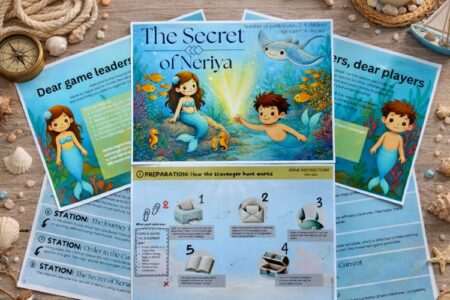
Ready to play instantly & easy to set up:
Stress-free for your kid’s birthday: Just print our scavenger hunts — about 30 minutes of prep.
✅ Includes an invitation
✅ Includes riddles & clues
✅ Includes a treasure map
✅ Includes answer keys
✅ Includes a certificate
✅ Includes easy instructions
✅ Includes a full storyline (for reading aloud & getting kids excited)
✅ Perfect for indoors & outdoors


14,99 $

14,99 $
14,99 $
14,99 $
What You Need for Wax Pouring – The Ultimate Craft Checklist
Before the waxy fun begins, you only need a few simple items — and you probably already have most of them at home. No special tools, no fancy equipment. Just a little heat, a bowl of water, and lots of imagination.
Here’s your wax-pouring starter kit:
🕯️ Wax: Leftover candle pieces or tealights work perfectly. Colorful candles make it even more fun!
🥄 Metal spoon or a small pouring ladle (avoid plastic — hot wax and plastic are *not* friends)
🔥 Tealight or stovetop for melting the wax
🥣 Bowl of cold water — a clear one works best so you can see the magic happen
🧻 Paper towels for drying the finished shapes
💡 Optional: A small tong or heat-resistant glove for steady spoon-holding
And now the most important part: kid-safe supervision! Even though this is a child-friendly activity, anything involving hot wax requires an adult nearby — especially to make sure the spoon doesn’t turn into a catapult projectile.
Step-by-Step Guide: How Wax Pouring Works with Kids

Now things are heating up — literally! Here’s the step-by-step guide that even beginners and little firecrackers will enjoy. Ready? Grab your spoon and let’s go!
🔥 Step 1: Melt the Wax
Place a tealight in a holder and position a metal spoon with a few wax pieces above the flame. Alternatively, you can melt the wax in a small pot on the stovetop over low heat. Important: Never leave it unattended! Wax melts quickly — and it loves surprises (as in: it may splatter).
💧 Step 2: Prep the Water
While the wax melts, fill a medium-sized bowl with cold water. Optional: Add a few ice cubes — it makes everything more exciting, especially when they crack as the hot wax hits them.
🪄 Step 3: Pour & Marvel
This is the big moment! Hold the spoon with the melted wax above the water bowl and tilt it carefully. Instantly, wild shapes begin to form — some delicate, some clumpy, some absolutely and truly a giraffe wearing a hat.
🧻 Step 4: Let It Dry
Use a spoon or your fingers (once it’s no longer hot!) to gently fish out the cooled wax sculptures. Place them on paper towels to dry — and admire your tiny artwork.
And now? Time to interpret, guess, and giggle as wildly as you want!
Wax Art or Tadpole? — The Interpreting Is the Best Part!
Now comes kids’ absolute favorite part: What did we just make?! Suddenly, those little wax blobs transform into the wildest things. Kids are natural imagination pros — and that’s exactly what wax pouring is all about: not “right” or “wrong,” but fun, creative interpretations that often reveal more about your little artists than any therapy session ever could.
Here are a few classic interpretation categories:
🔮 Animals: “That’s obviously a llama on rollerblades!”
🍀 Good-luck charms: “It’s a heart! That definitely means I get extra dessert tonight.”
🚀 Adventure objects: “Looks like a pirate ship with a slide — we need to go to the backyard now!”
🌈 Pure randomness: “I have no idea what that is… but it looks cool!”
Parents are allowed to join the guessing — but be warned: Kids won’t take you seriously if you’re too logical. Statements like “That looks like… a drop” are strictly forbidden. Better say: “Clearly a dinosaur backing up!”
Tip: Want to extend the fun? Kids can draw what they “see,” or turn their interpretations into stories using a printable prompt — every wax shape becomes a mini fairy tale.
Game Ideas & Variations: How to Make Wax Pouring Even More Fun!
 Simply melting wax and guessing shapes isn’t enough for you? Perfect — then let’s turn this into a full-on action show for kids! Wax pouring can do so much more than create funny shapes in water. Here are some wildly entertaining variations to take this activity to the next level:
🎭 Wax Theater
Everyone gets to pour three shapes. Then each child creates a mini story using their wax figures and performs it. Warning: major giggle attacks ahead!
🎨 Wax & Drawing
Use the wax shapes as inspiration: What does it remind you of? Kids can draw their interpretation around or next to the shape. You’ll end up with an imaginative art gallery filled with creativity and funny stories.
🎲 Wax Oracle Deluxe
Each child draws a small card with a hidden meaning (e.g., “Good luck,” “You’ll learn something new today,” “Adventure is coming”). Then they pour their wax — and see which shape matches their message best. High fun factor, surprisingly thoughtful.
🧠 Wax Guessing Game
One person pours a wax figure — everyone else must guess what it looks like. The closest guess (according to the pourer) gets a point. The wildest idea earns applause. And if someone sees absolutely nothing, they still get to laugh with the rest.
And just like that, simple wax pouring turns into a colorful, interactive show full of creativity, imagination, and childlike brilliance.
Safety & Clean-Up – So Your Kitchen Survives the Wax Adventure
As fun as this activity is, hot wax is still… hot. And when things go wrong, you suddenly have a brand-new candle decoration on your kitchen floor. So here are some smart tips to keep the whole experience safe and mess-free:
🧯 Adults stay at the stove
Wax gets very hot — so melting it should always be handled by an adult. Kids can help with the pouring, but only under supervision.
🧼 Cover the table to avoid stress
Lay down newspaper, an old tablecloth, or even a baking tray under your wax workshop. It’ll save you from scraping dried wax off surfaces later.
🥄 Use only metal spoons
Plastic spoons and molds melt — and they smell more like “chemistry experiment gone wrong” than lavender candle.
💧 Ice water, not lukewarm
Cold water is key! It helps the wax harden faster and reduces splattering. Bonus: Kids love the sizzling sound when hot wax hits the icy surface.
🖐️ Let wax figures cool down first
Little hands are curious — but wait a few seconds before fishing out the shape. Blisters are nobody’s idea of fun.
🪣 Don’t pour waxy water down the drain!
When disposing of the water, make sure no wax pieces remain in it. Wax belongs in the trash, not in the pipes — unless you want a surprise visit from a plumber.
With these tips, wax pouring stays clean and safe — at least until the interpretation part begins and someone insists, “This is clearly an elephant on roller skates!” (Spoiler: It was actually a worm.)
When Wax Pouring Works Best – Basically Always
You might be thinking: “Okay, cute idea — but when should we even do this?” Easy answer: Whenever boredom strikes, the weather is awful, or the family needs a little magic. Wax pouring is one of those all-rounder kids’ activities — it works indoors, needs almost zero prep, and still delivers a huge “wow” moment.
Here are some perfect moments for a wax-pouring session:
🎉 Kids’ Birthday Parties
Between cake and party games, a quick wax-pouring round is perfect — especially if each child gets to take home their own “Wax Figure of the Day.”
☔ Rainy Afternoons
Is it raining? No desire for board game #38? Wax pouring guarantees chatter, giggles, colorful ideas — and it feels a bit like a tiny home science lab.
📚 School or Preschool Project Days
Teachers and educators love this one! Wax pouring works perfectly with themes like “Elements,” “Art & Imagination,” “Guess the Object,” or simply “We’re doing fun stuff with warm goo.” Kids learn something — without realizing it. Win-win!
🌙 Sleepovers & Pajama Parties
When the energy dips and everyone is too tired for wild games but too awake to sleep: a cozy, quiet wax-pouring session in soft lighting feels like a campfire — without the campfire.
🎁 Wax Figures as Gift Ideas
The prettiest shapes can be dried, glued onto card stock, and turned into “personal lucky wax” gifts — maybe with a tiny drawing or note. Voilà: a 5-minute DIY present with heart.
Conclusion: Wax Pouring – A Hidden Gem for Little Artists, Big Dreamers & Curious Parents
Wax pouring with kids is one of those activities that is surprisingly simple, delightfully chaotic, and wonderfully creative. You don’t need fancy supplies or Pinterest-level crafting skills — just a bit of wax, a spoonful of patience, and a whole lot of playful curiosity.
Whether you need a last-minute idea for a birthday party, want to add some spark to a slow Sunday afternoon, or simply feel like discovering what a blob of wax can turn into — maybe a “flying pudding with teeth”! — wax pouring always delivers.
And the best part? You’re not just giving your child a fun activity — you’re giving them the joy of creating something themselves. A tiny artwork, a wild interpretation, and that proud sparkle in their eyes.
Want even more DIY ideas and craft ideas? Here are more creative activities
FAQ – Common Questions About Wax Pouring With Kids
From what age is wax pouring suitable?
From around age 5 with close adult supervision. Younger children can watch but shouldn’t handle the hot wax yet.
What kind of wax can I use?
Any type of candle wax works — the more colorful, the better! Beeswax works too but takes a little longer to melt.
Can I keep the wax shapes?
Yes! Store them in a cool place or glue them onto cardstock. (Tip: pockets are not their natural habitat — they don’t last long there!)
Are there alternatives to using a spoon?
Small metal ladles or heat-safe pouring tools work too — just avoid plastic utensils at all costs!
How do I dispose of leftover wax?
Let it cool completely and throw it in the trash — never pour wax down the sink!
Paper Clue Scavenger Hunt
$4.99 — View & Download